My Quick and Dirty But
Effective Lightbox for Shooting Flatfields
 I have been using low aperture (camera lenses) on a small CCD camera (Cookbook 211) to image really faint astronomical objects (surface brightness 15 local group galaxies). After some success at pulling these faint things out of the background (in some cases one ADU count per 15 seconds), it became apparent that the pixel sensitivity variation was a significant source of noise. I had avoided flatfielding because I could not get twilight flats to work, mostly because the uncovered readout area causes a smear/gradient. I had to have a light source that would be on during integration but off during readout. It had to be even illumination and I wanted it to be ready in a week for the next new moon.
This had to be cheap, dirty and quick. I think it took more time to write this narrative and sketch the figures than to actually build it. Here is how I did it:

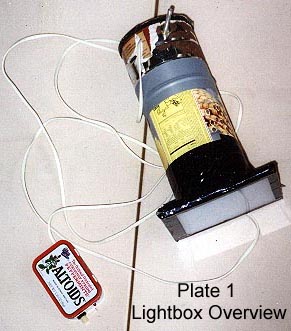
My lightbox (small diameter for CB211 through telephoto lenses) uses red, green and blue LED's mounted in a structure composed of two tin cans. The two 4-inch diameter cans are taped together at the bottoms. The LED's are in the smaller can, peeking through a hole cut in the bottoms of the cans. The light from the LED's is mixed and diffused with three layers of diffusers at about 3-inch intervals. The first diffuser is located in the smaller can and holds the LED's. This first diffuser is composed of three layers of 1/4-inch milky polyvinyl (I think) with one layer of vellum (see figure 2 and plate 2). The middle diffuser is a circle of vellum taped midway in the larger can. The third diffuser (closest to lens) is vellum sandwiched between two pieces of the milky polyvinyl and held together and onto the bottom can with black cloth tape. White plexiglas would be a better diffuser but I had the polyvinyl stuff in the garage.


The LED's are wired in parallel with dropping resistors to get to a similar level of brightness for each color (Figure 3) in kind of a ratsnest of wiring (Plate 2). Your values may vary from mine since most came out of junkbox with no part numbers. I put a variable resistor potentiometer in series with the green to act as a rough color balance. I was not shooting color when I built it so forgive me for the lack of calibration. It is pleasing to think of balanced color (eyeballed) for monochrome images.
How I Use It
To shoot flats, I point optics to zenith and rest the last diffuser on the lens. Black velvet drape keeps ambient light from leaking through the bottom diffuser. 15 seconds gets to half scale on my 12bit 211 camera through f/3.5 200mm fl vivitar lens. Because the 211 does not have a covered readout area, I have to turn off the LED's during readout, so I control the lights with a remote pushbutton switch - I hold the button down during integration and release it 1 second before integration ends. It is boring but necessary. This is not a problem for most cameras and you would not need a remote or a pushbutton.
Return to Dennis Webb's Page
View Dennis's recent CCD images
This page built by Dennis Webb on September 30, 1999.